AlphaPasso: Simulated Game Session using MoveIt 2 & Gazebo
This is the continuation of the AlphaPasso project previously described here. The end goal for the project is to create a physical robot capable of playing the Passo board game against a human. This page will describe the motion planning and simulation components for the robot.
Methodology
There are three main components necessary to enable motion planning and simulation for the robot: ROS 2, MoveIt 2, and Gazebo Sim. I will not describe what each of these tools do in details; instead I will elaborate on the work I did in relation to them.
ROS 2 Nodes
Communication between components is handled by ROS 2. Below is the architecture diagram showing the component interactions.
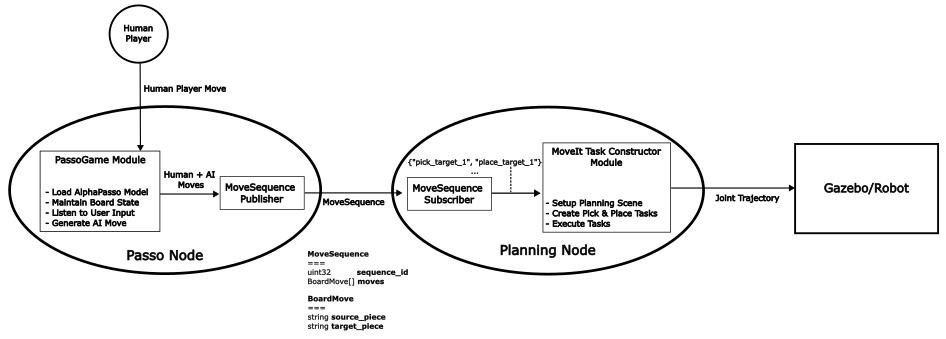
The Passo node includes the PassoGame module and MoveSequence publisher. The PassoGame module mostly handles game logic and AI player move generation, but it also handles user interaction. Human players specifies their moves through a PyGame screen. For more details, please refer to this page where this same module was previously described.
Based on the changes in the board state (after human and AI player moves), the necessary information containing pieces to be moved and their destination is packaged into a MoveSequence message. MoveSequence is a custom ROS message represented by sequence_id and moves, where moves is an array of the BoardMove type. BoardMove itself consists of source_piece and target_piece strings. The former represents the desired piece to be picked up, and the latter represents where the piece need to be placed relative to. For example, {“piece_0_0”, “tile_1_0”} means move “piece_0_0” to the top of “tile_1_0”. When tile pieces are specified as the source_piece, they will always have an empty string (“”) as the value for target_piece. This is because tile pieces can only be removed from the game board; they cannot be stacked onto another pieces.
The Planning node, as its names suggests, is responsible for planning the robot (pick-and-place) motions that will produce the same board state reported by the Passo node. This node includes MoveSequence subscriber and a MoveIt Task Constructor (MTC) module. The former listens for MoveSequence messages as previously described, and the latter will be described in further detail next.
MoveIt 2 / MoveIt Task Constructor (MTC)
MoveIt is a set of tools that enables roboticists to design and generate robot trajectories for manipulation tasks. Additionally, the MoveIt Task Constructor (MTC) framework helps deconstruct complex planning tasks into multiple interdependent subtasks. Specifically for this project I modified the pick-and-place example from the MoveIt website.
The setupPlanningScene function was modified to include the necessary collision objects: the table, tile pieces, and disk pieces. Furthermore, I refactored the code blocks where the various stages (open hand, approach object, grasp, etc.) are constructed. The refactored function pickAndPlace accepts source_piece and target_piece as inputs, parameters previously described in the “ROS 2 Nodes” section.
Each time the MoveSequence subscriber callback is triggered, the createTask function creates a separate pick-and-place task for each move in the sequence. Each task is executed (once solution is found) before a subsequent one is created. This ensures that the pick-and-place planning uses the most updated state (location) of the collision objects. Otherwise, the robot might attempt to pick or place an object that is no longer there.
MoveIt & Gazebo Integration
Gazebo Sim is a widely used robot simulator that enables engineers to test robots in a simulated environment that includes physics and contacts. For this project, I used the project available in this GitHub repo as a starting point. The project provides a great setup for the MoveIt and Gazebo integration. Specifically it contains the SRDF (used by MoveIt), as well as the Xacro, URDF, and YAML (used by Gazebo) files necessary for the Panda robot simulation.
I created custom Xacro and SDF files to describe the board/table, and playing pieces. Note that the dimensions for the tiles and disks are not the exact ones used in the published board game. Instead, they were modified to accomodate the workspace of the robot arm and gripper. Furthermore, I had to increase the joint torque limit values inside the robot description, as the controller was initially unable to reach the desired positions.
Robot control is achieved using the ros2_control framework, and the integration between Gazebo and ros2_control is handled by the gz_ros2_control package. The JointTrajectoryController with position command interface is used to control both the arm and the gripper. The joints follow the trajectories sent by the MTC module. I attempted to use the the GripperActionController and parallel_gripper_action_controller for gripper control but to no avail. I will revisit these controllers at a later stage if necessary.
Result
The GIF below illustrates a sequence of robot arm motions for a pair of human and AI moves. The left side shows the visualization of the motion planning and execution in RVIZ, while the right side displays the motions executed in Gazebo Sim, incorporating physics and contact dynamics.
The red pieces are controlled by the user, and the black pieces are controlled by the AI player. Using the PyGame UI, I execute a move with a red piece, after which the AlphaPasso model generates a counter-move. Currently, the robot arm executes moves for both the human and AI players; however, in future iterations, the arm will only be responsible for the AI’s moves.
For any given pair of human and AI player moves, the pick-and-place motions are generated and ordered so that the human’s move is completed first, then followed by the AI player’s move. Furthermore, the robot is programmed to move disk pieces prior to tile pieces to maintain board integrity during transitions.
The GIFs below demonstrate the stacking and unstacking motions for the disk pieces. The motions were achieved using the same pick-and-place routine and the Panda arm robot was able to succesfully stack and unstack the pieces.
A complete simulated game session can be seen in the GIF below (running at 15x speed), showcasing the end-to-end integration of the game logic, AI move generation, and robotic execution.
Future work
The next steps for the project would be to replace the user interface part to enable direct interaction with the robot. It would be more realistic for humans to execute their moves directly on the board (at least when playing against the physical robot) instead of using the PyGame interface. This would require building a perception module where the robot can evaluate the board state after the human player finishes moving the pieces. For simulation purposes I will keep using the PyGame interface as the entry point for human player moves, however the board state evaluation will be done by the perception module.
Further, it would be necessary to tie all the modules/tasks together using a behavior tree. It is currently missing in this project as the robot motion is tied directly to the PyGame module interface. As previously described, after each pair of human and AI player moves is completed in the PyGame interface, the motion planning module would generate separate MoveIt tasks for pick and place motions that will satisfy the given (players’) moves. Additionally, currently it is assumed that the pick and place motion is always successful. A behavior tree will enable the system to handle the cases where the robot fails to do so.
Lastly, I will continue developing the simulation using the Panda arm robot description for now but eventually it will be replaced with the Robotis OMX arm description. I would love to deploy the finished system using a real Panda robot arm but the $350 or so Robotis OMX arm is more palatable for the scale of the project. Nevertheless, I think it is beneficial to develop using a more established platform first. I would imagine replacing the robot description will trigger some additional work but nothing major hopefully.
In the next iteration of the project I aim to implement the following components:
Behavior Coordination and Execution
- BehaviorTree.CPP: Implementing a high-level coordination layer for plan execution and error recovery.
Game State Evaluation & Detection
- OpenCV: Detecting the grid and tile pieces using ArUco markers.
- Vision System: Evaluating camera placement (end-effector vs. fixed mount) and performing intrinsic/extrinsic camera calibration.
Hardware Deployment
- Physical Execution: Porting the pick-and-place motion pipeline to the Robotis OMX arm.